Implementing Login with JWT in Spring Boot + Vue.js
Building a login feature using Spring Boot Restful API and token-based authentication.
Development Environment
- Spring Boot Version : 2.0.5.RELEASE
- Build Tool : Gradle
- JDK Version : 1.8
- Vuejs Version : 2.5.2
- IDE : VSCode
What Are We Going to Build?
As frontend frameworks have grown rapidly in recent years, services built with the Restful API + frontend framework combination are becoming increasingly common. Today I want to walk through implementing a login feature — something I personally struggled with quite a bit while working on a Spring Boot + Vue.js project.
Architecture Overview
When you think of a login feature, what comes to mind? If you have experience with JSP, you might immediately think of embedding tokens directly in forms. In projects where the backend and frontend are not fully decoupled, the server continuously maintains a session and stores login information in a session cookie. I had previously implemented login and authorization incredibly easily using the devise gem in Ruby on Rails, so when I switched to Spring Boot I realized I had to build everything from scratch.
Let''s think about it at a high level. In an architecture where the server and frontend are completely separated, how can the server identify whether a client is a legitimate user and who that user is? Just like getting a number ticket at a restaurant and waiting until you''re called, the client needs to receive some kind of identity token to prove who they are. We call this a "token," and this token is stored in the client''s local cookie.
You might be wondering — do we really have to use cookies? That sounds risky and insecure. Fair concern — some precautions are necessary.
The token must be stored in a secure HttpOnly cookie. This prevents Cross-Site Scripting (XSS) attacks.
If you use a cookie to transmit the JWT, CSRF protection becomes critical. A malicious third-party domain could trigger requests to your web server without the user's knowledge. If you use cookies as the token transport mechanism, you must have CSRF countermeasures in place.
....
Refer to the "Is the token safe?" section in the JWT Java Guide post for more detail. (Note: the referenced example uses a library other than Spring Security.)
Walking Through the Flow
- The user registers an account. (No authorization required.)
- The server encrypts the user''s password and stores it in the database.
- The client sends a login request with the registered username and password.
- The server retrieves the user''s password from the database, decrypts it, and verifies it matches what was submitted.
- If it matches, the server issues a token to the client.
- The client stores the received token in a local cookie.
- The client includes the token in the header of every subsequent request to the server.
- The server validates the token whenever it receives a request.
Key Classes and Methods
Webconfig: A Spring Security@Configurationclass. OverridesaddInterceptorsto intercept incoming requests and authenticate the user before they reach the handler.addInterceptor: Callsregistry.addInterceptor(jwtInterceptor)to register the authentication logic.preHandle(request, response, handler):jwtInterceptoroverrides Spring''sHandlerInterceptor. ThepreHandlemethod is overridden to inspect the token.jwtService.isUsable(token): Validates whether the token is valid.UserController: Once execution reaches the controller, it means the token is valid.@GetMapping public Users getUser("/") { ... }: The API matching the user''s URL is executed.
References
The post Using JWT in a Spring Boot environment by AlwaysPr — most of the code in this article is drawn from that post.
You can find the complete source code in my project repository.
Code
build.gradle
buildscript {
    repositories {
        mavenCentral()
    }
    dependencies {
        classpath("org.springframework.boot:spring-boot-gradle-plugin:2.0.5.RELEASE")
    }
}

apply plugin: 'java'
apply plugin: 'eclipse'
apply plugin: 'idea'
apply plugin: 'org.springframework.boot'
apply plugin: 'io.spring.dependency-management'

bootJar {
    baseName = 'gs-spring-boot'
    version =  '0.1.0'
}

repositories {
    mavenCentral()
}

sourceCompatibility = 1.8
targetCompatibility = 1.8

dependencies {
	implementation 'org.springframework.boot:spring-boot-starter-thymeleaf'
	implementation 'org.springframework.boot:spring-boot-starter-web'
	implementation('org.springframework.boot:spring-boot-starter-actuator')
    implementation('org.springframework.boot:spring-boot-starter-data-jpa')
	compile('org.springframework.boot:spring-boot-starter-security')
    compile group: 'io.jsonwebtoken', name: 'jjwt', version: '0.7.0'
    compile('org.springframework.security.oauth:spring-security-oauth2')
	compileOnly 'org.projectlombok:lombok'
	runtime('com.h2database:h2')
	annotationProcessor 'org.projectlombok:lombok'
	testCompile("junit:junit")
	testImplementation 'org.springframework.boot:spring-boot-starter-test'
}
If you already have a build.gradle, you should only need to add compile group: 'io.jsonwebtoken', name: 'jjwt', version: '0.7.0'. Adjust the jjwt version to match the Spring Boot version you are using.
security/Webconfig.java
package com.greenhair.template.security;

import org.springframework.beans.factory.annotation.Autowired;
import org.springframework.context.annotation.Configuration;
import org.springframework.web.servlet.config.annotation.InterceptorRegistry;
import org.springframework.web.servlet.config.annotation.WebMvcConfigurer;

@Configuration
public class WebConfig implements WebMvcConfigurer {
    private static final String[] EXCLUDE_PATHS = {
        "/api/users/create",
        "/api/users/login",
        "/member/**",
        "/error/**"
    };

    @Autowired
    private JwtInterceptor jwtInterceptor;

    @Override
    public void addInterceptors(InterceptorRegistry registry) {
        registry.addInterceptor(jwtInterceptor)
                        .addPathPatterns("/**")
                        .excludePathPatterns(EXCLUDE_PATHS);
    }
}
service/JwtService.java
package com.greenhair.template.service;

import java.util.Map;

public interface JwtService {
	<T> String create(String key, T data, String subject);
	Map<String, Object> get(String key);
	long getMemberId();
	boolean isUsable(String jwt);

}
service/JwtServieImpl.java
@Slf4j
@Service("jwtService")
public class JwtServiceImpl implements JwtService{

    ....(omitted)

    @Override
	public boolean isUsable(String jwt) {
		try{
			Jws<Claims> claims = Jwts.parser()
					  .setSigningKey(this.generateKey())
					  .parseClaimsJws(jwt);
			return true;

		}catch (Exception e) {

			if(log.isInfoEnabled()){
				e.printStackTrace();
			}else{
				log.error(e.getMessage());
			}
			throw new UnauthorizedException();

		}
	}
}
Verifying the Token
I tested the login flow using Postman. The response is kept as simple as possible — it only returns the token.
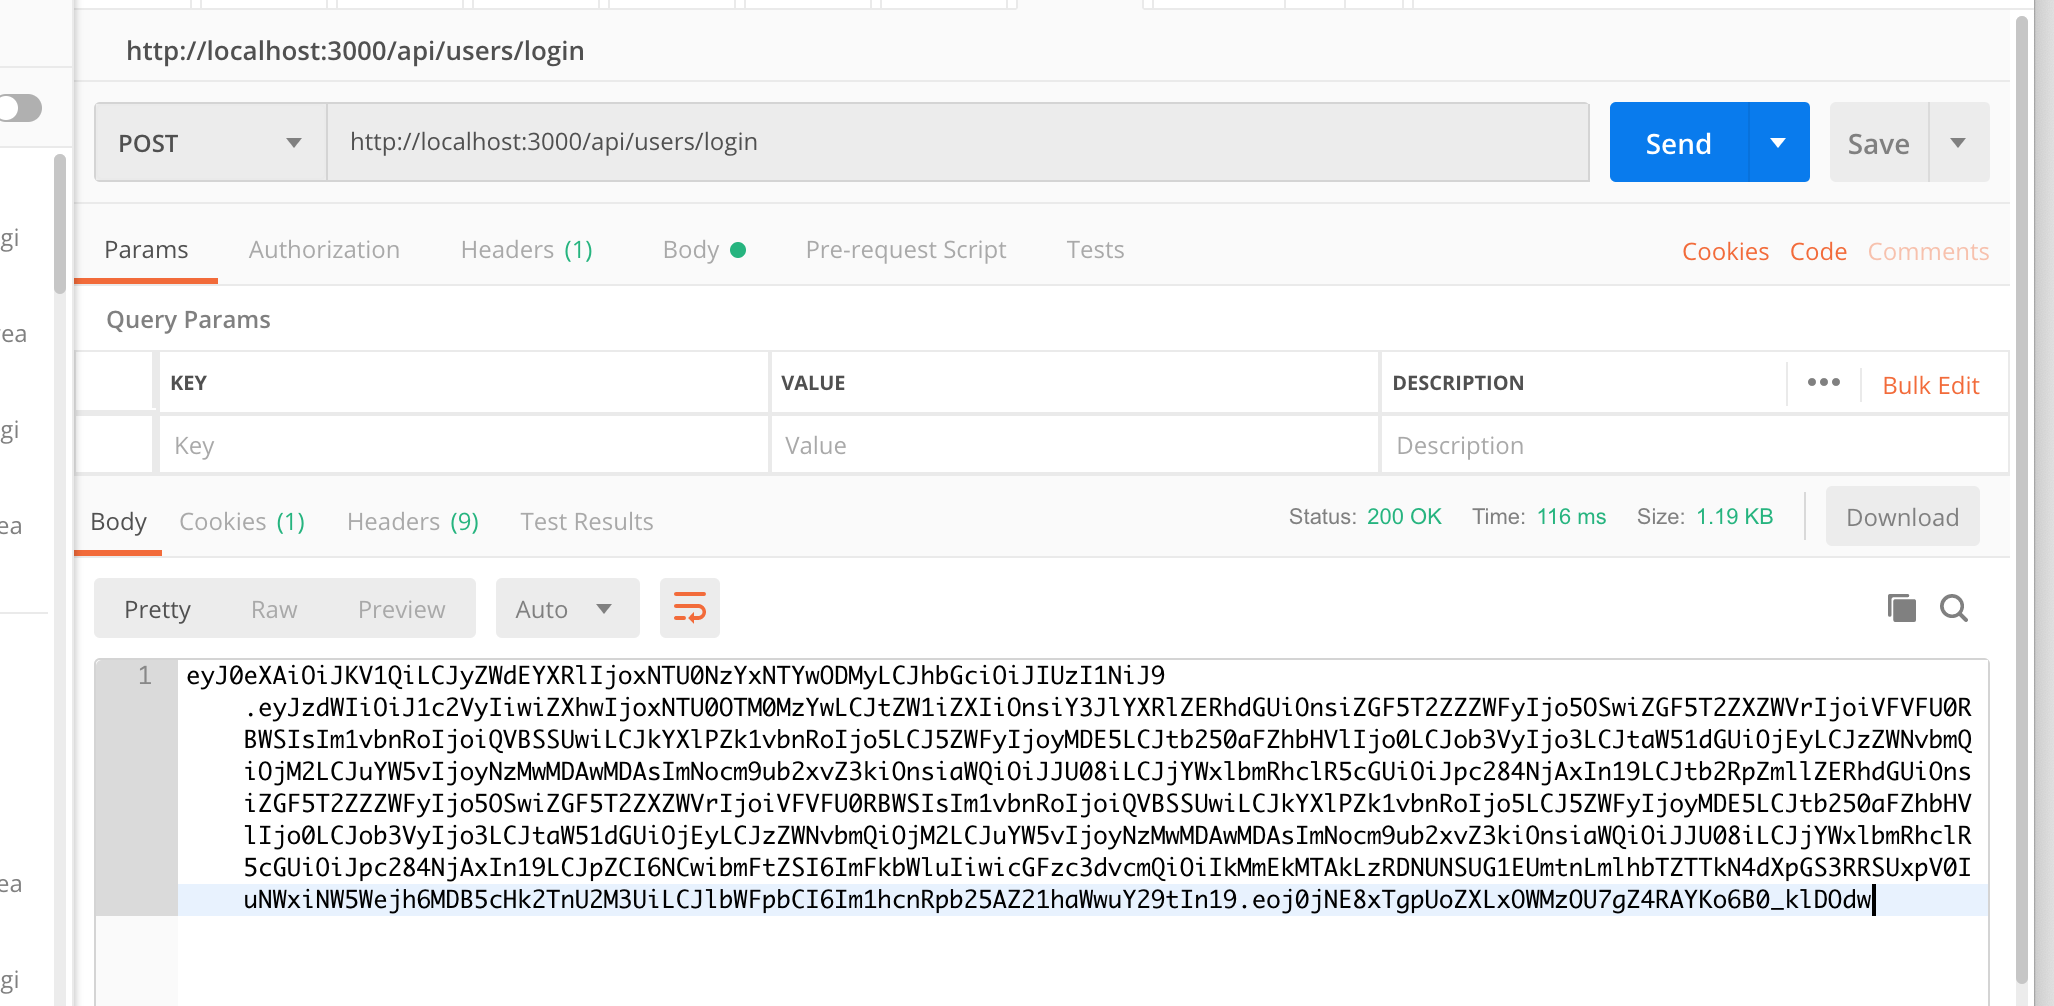
You can confirm that the token is returned correctly.
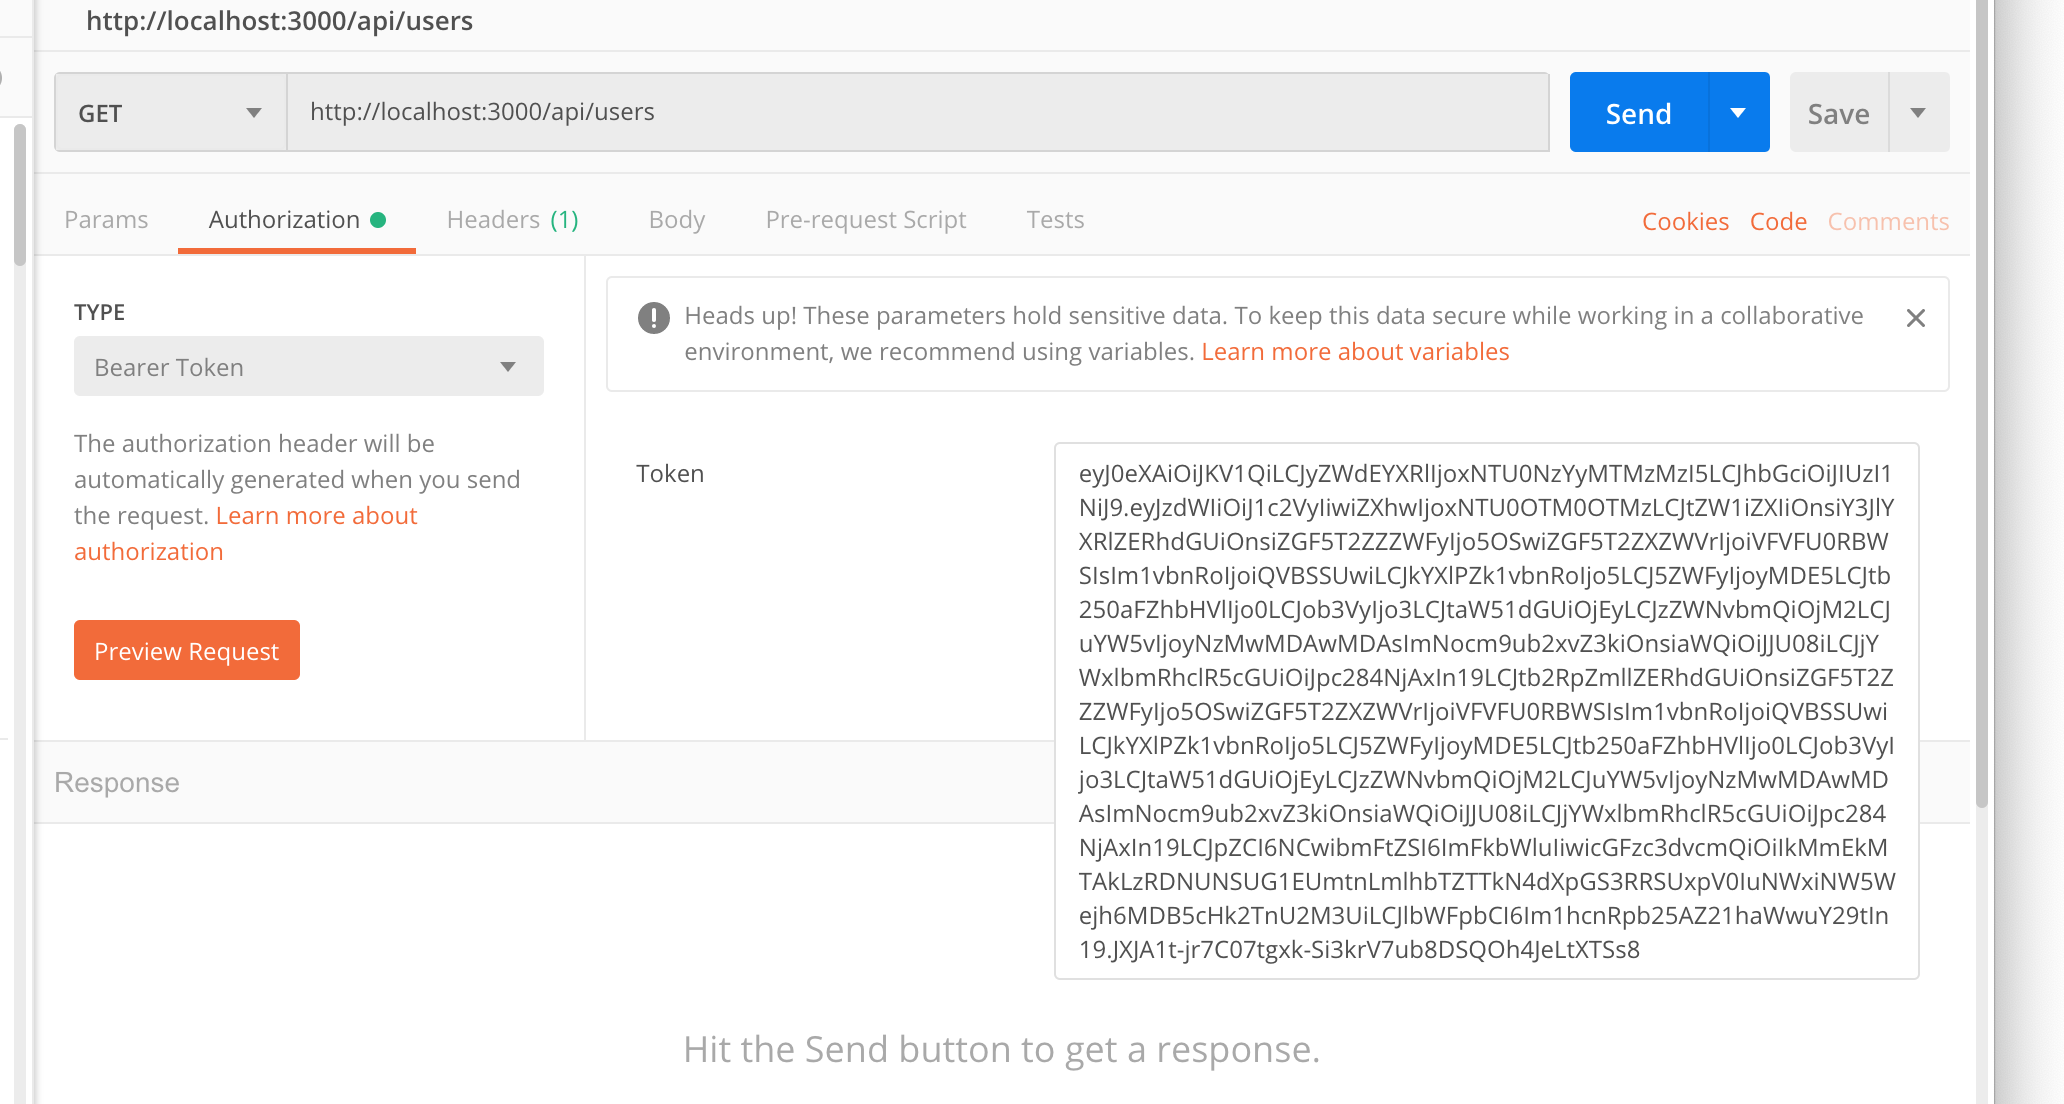
Take the returned token, select "Bearer Token" under Authorization (simulating how the client would send it from a cookie), and paste it in.
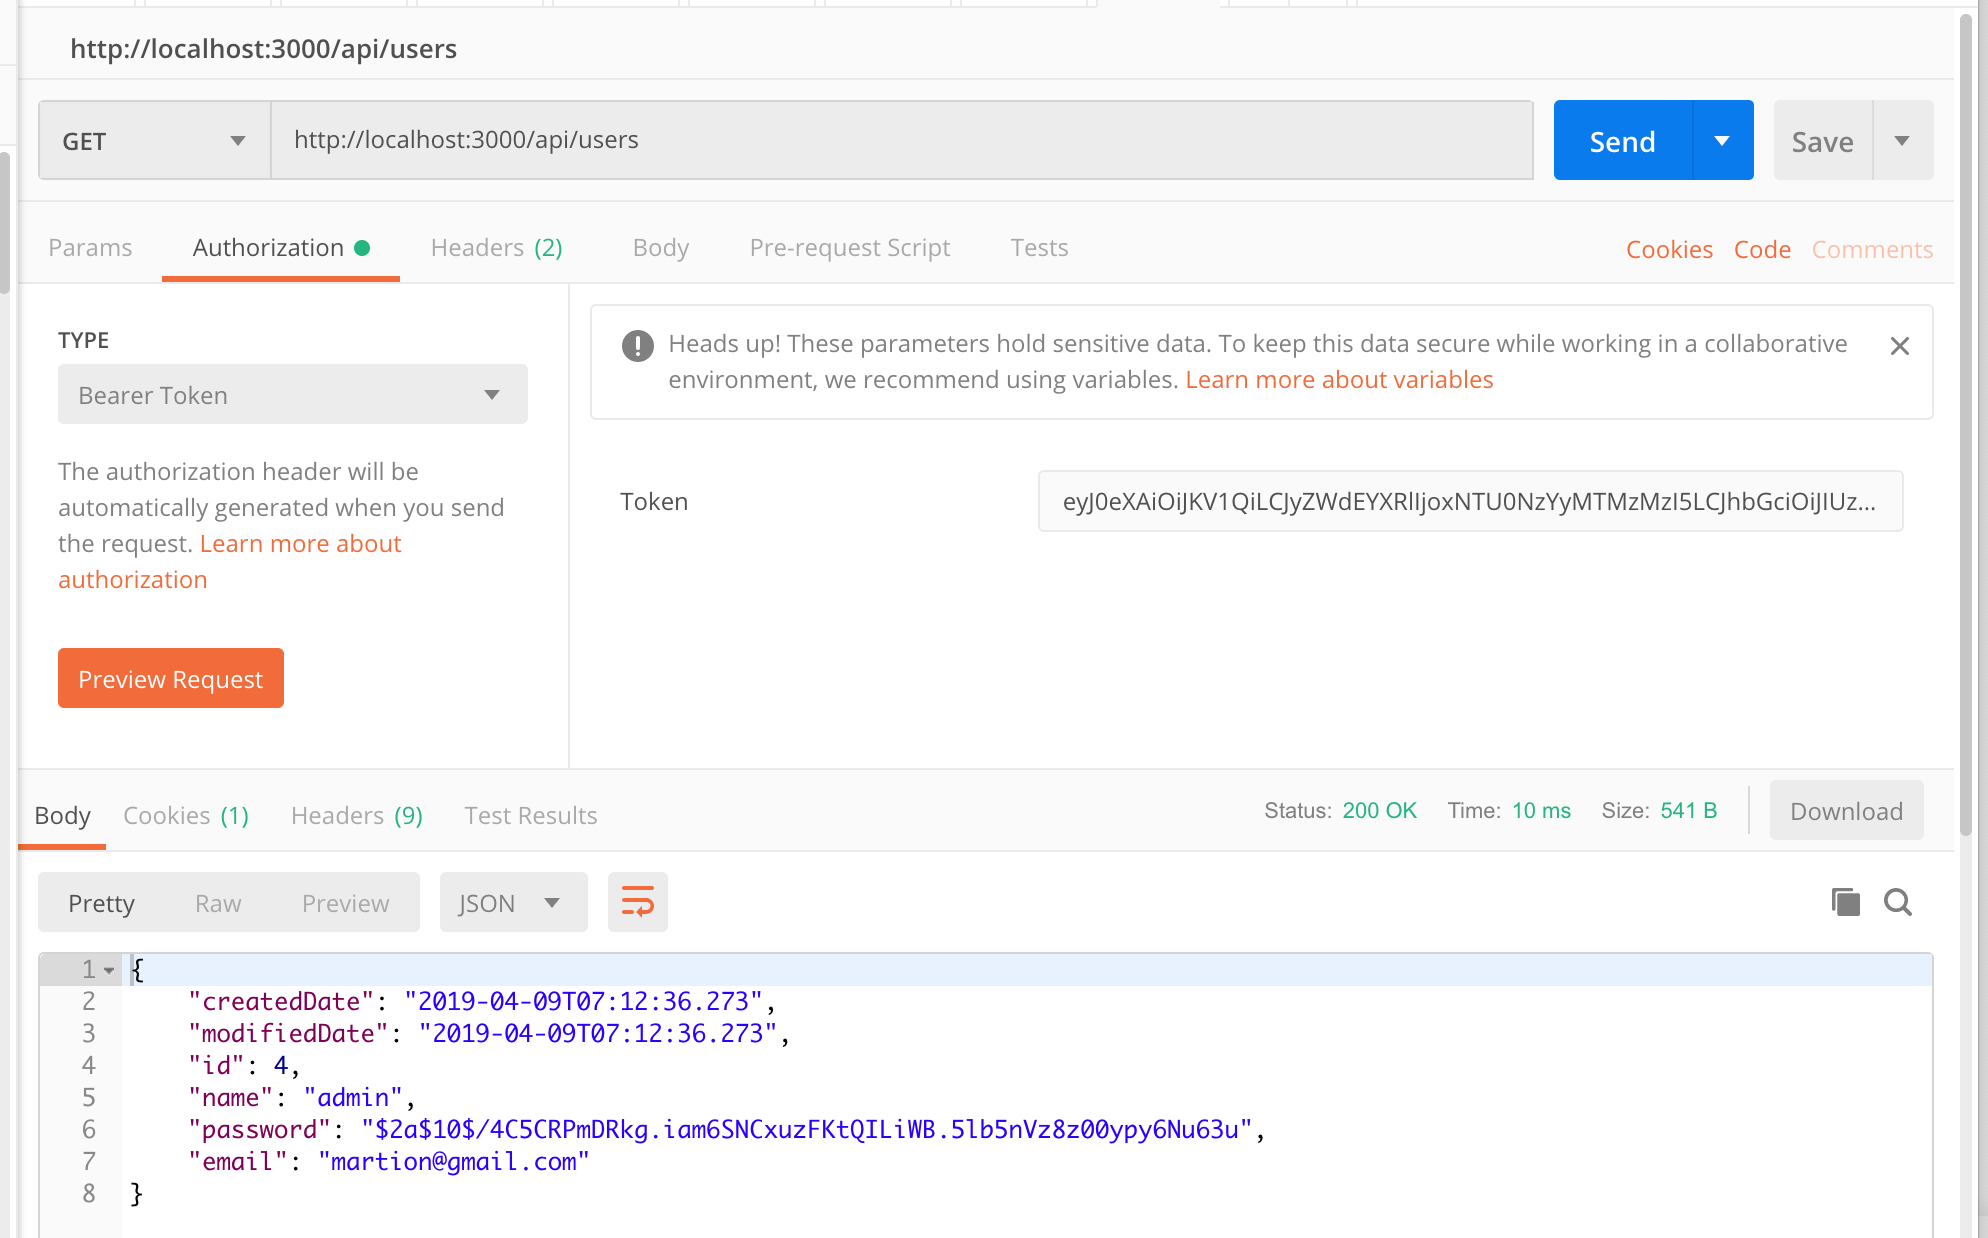
User information is returned without any errors.
- If you encounter a 405 error, the possible causes are: 1. the token has expired, 2. something went wrong in the authentication process, or 3. the appropriate API endpoint hasn''t been created in the controller. Check the error logs carefully to diagnose the issue.
Conclusion
When I first started, I naively thought "I just need to implement a login feature." Having built it in Rails where a single gem handles everything, switching to Spring Boot made me realize just how many technologies are involved — Spring Security, JWT, OAuth2, and more. I spent a long time wandering around without finding a fully working example before finally pulling it together. I hope this write-up helps anyone who needs to build a login feature from scratch in the future.
Next Steps
- Write tests: Use Spring MVC Test to call the API and verify that registration and login work correctly end-to-end.
- Implement the same feature using Spring Security.